Typography Task 03(A): Type Design & Communication

08/10/2021 - 29/10/2021 (Week 07 - Week 10)
Adena Tan Sue Lynn / 0345769 / Bachelor of Design (Honours) in Creative Media
Typography
Task 03(A) / Type Design & Communication
Lecture
Lectures 01-05 are in Task 01: Exercises.
Lecture 06 is in Task 02: Typographic Exploration & Communication.
Week 07 (08/10/2021)
In today's class, we were briefed on this very task. Below are notes which I have taken down whilst Mr Vinod was explaining.
- We require FontLab, but do not download it for now. On Campus, the version provided in the labs is Version 05. Thus, for versatility, it can be better to download Version 05, but Version 07 is an option as well. However, do not download Version 06.
- Construction of Letterform: Program to be used is Adobe Illustrator, for now.
- Before sketching, it is crucial to do necessary analysis, further readings, research, etc, to ensure that there is a tremendous amount of knowledge.
- Choose an existing font design from the Ten Typefaces.
- It serves as a guide, but doesn't necessarily restrict.
- Remember to study the font chosen carefully by using certain letters & characters.
- Start rough, but detailed sketches (A minimum of five is good).
- When creating typefaces, we should remember: subtlety, character, presence, legibility & readability.
We were also instructed to watch a series of videos provided by Mr Vinod regarding this task. Below are the information I have received, from said videos.
Typography Task 3A - Typeface Construction (Shapes)
- Before starting, it is reminded to read the Module Information Booklet thoroughly.
- Then, it is important to find and discover good typefaces from various places [Pinterest, Google, etc] to learn what the possibilities and options that we can go into. Then, we can go into the process of sketching.
- When sketching, the letters AOTH are good letters as they can interchange and be versatile.
- Upon completing sketches, choose one or two. Then, look for a reference that comes close to the typeface sketch that we are working on from the Ten Typefaces.
-
When analyzing, type out the letters with the chosen typeface [from the ten]
and then deconstruct them. Look at the nuances & details at how the
letterform is constructed. "To see is to understand."

- Deconstructing can be done on Adobe Illustrator.
- Board's height is 1000 pts. X-height has to be 500 pt. Curved areas tend to overshoot.

- Pen & Shape tool is best for creating forms.
- When creating the forms, it can be helpful to duplicate & put extras outside the artboard to use for other letterforms.
- Always have the original construction of the letters. Easily duplicate the artboard and its' contents before finessing.
- Can unite the shape with pathfinder. You can easily structure the shapes after.
- The letterforms can differ slightly from original sketch when it calls for it.
Instructions
Task 03(A): Type Design & Communication
Typography Research
As suggested by Mr Vinod, I decided to look at existing typefaces to see the possibilities. First, I decided to look at my favourite typefaces. The first one being Lemon Milk. It is a Sans-Serif typeface which has been my favourite for years. I always liked how clean and sharp it looked.

Next, is a new favourite of mine; Omnes. Usually, I would choose the Semibold font, but I wanted to look deeper into the original structure and layout of the typeface. I like how the typeface makes letters look rounded and playful, without making it seem too much.

I also looked at this Glossary of terms which is the header for the Facebook group. Using this to remember the previous lecture was helpful for me.


In Figure 2.2.1, the sketches are explained as follows:
- 1st: I had a dream of making the A. My idea was the curved left and the straight right.
- 2nd: A somewhat italic design. I thought the mini tails were cute.
- 3rd: I was somewhat inspired by this brand of Greek Yoghurt.
- 4th: I had no idea what I was doing. A sharper top with flatter bottoms. Somehow reminded me a little bit of Star Wars' scroll whatchamacallit even though it looks nothing like it.
- 5th: I drew the 'a' and was too happy with how it looked. The other three looked extremely botched.
- 1st: These were extremely, tremendously inspired by my mother's glasses as she was sitting right in my field of vision as I was sketching these.
- 2nd: A variation of the first sketch, but with the t & h being taller instead of the same height.
- 3rd: Once again, I was somewhat inspired by that Greek Yoghurt. 't' & 'h' were not my cup of tea, however.
- 4th: A variation of the third one.
- 5th: I will admit, I have no idea what made me come up with this. Maybe it was somewhat of a mix between the 1st and 3rd sketches.
Type Reconstruction
After choosing my selected sketch, I tried to look for typefaces which looked more square and boxy. For this, I decided to try out deconstructing the typeface 'Rexlia'. I deconstructed the letters o, d, y & t.


I noted that these letters were mostly straight with some diagonal accents. They also used circles to curve their corners.

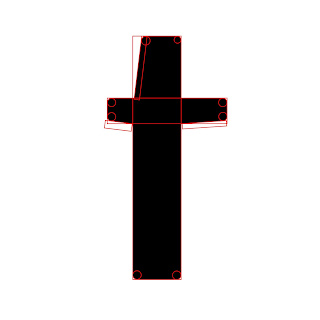
Digitization of Letters
Before starting, I created the following guidelines.
- Ascender Line: 733pt
- Capline: 696pt
- Median Line: 500pt
- Baseline: 0pt
- Descender Line: -228pt
- X-Height: 500pt x 500pt
For this, I used the letters 'Tyd" in Myriad Pro Regular. For the size, I used 1033pt. For the X-Height, I followed Mr Vinod's instructions of 500pt x 500pt.

The first letter I made was the letter 'o'. Despite my planned design being quite 'easy', I still had a hard time trying to figure out the best way to incorporate the diagonal lines. In the end, I figured that 45 degrees rotation suited it the best as the line wasn't too harsh in comparison to a 60 degree rotation.


Below was my first version of the letters.

For this particular design, the 'o' was the one who paved the way for everything else behind it. It provided a basic building structure which can be clearly seen within d, b, e, etc.. It also was the base to create the comma, exclamation mark, and more.
However, besides Mr Vinod's feedback for this, I had my own feedback for myself. Firstly, the 'm' was so messed up as I had troubled fitting it into the x-height. This made it necessarily wider than the other letters. It also looked really messy. Second, the exclamation mark had the shape of the 'o' to make it look softer at the edges instead of the basic sharp edge. The rest of the letters not having this made it look really lost in between. Having this in mind, I proceeded to create my second version.

For this version, I did a few things.
- I removed the vertical lines which were making the thickness in letters 'a', 'd', 'b', 'p', 'y' and 'g' uneven as recommended by Mr Vinod.
- I made the 'm' fit into the 500pt x 500pt X-height limit.
- I made the strokes have 'softer' finishes, using the letter 'o' as the base.
- I decreased the width of the letter 't' slightly.
- I ensured all letters fit the guidelines properly, and adjusted the lines to connect better. I ensured there were no awkward jabs sticking out at the edges.
Uploading into FontLab
As I was satisfied with my product, I proceeded to transfer it into FontLab 5, following Mr Vinod's video lecture.

After that, I started to kern the letters.

The one I paid the most attention to throughout the kerning process was the letter 't'. I felt like sometimes it would be too far, so I tried to kern each combination as equal as possible.

After I managed to kern the letters the way I like, I tried typing out some sentences within FontLab 5. Here were some of them.


I had lots of fun typing these out. It felt so fun to just keep typing as I watched my type come to life! Moving on, I decided to generate the font so that I could install it onto my computer. However, that proved to be difficult when the generated typeface smacked me in the face with the logo.

Luckily, I managed to fix it by downloading the FontLab7 demo! It allowed me to get rid of that god forsaken watermark. 'eat oat.' was a random thing that popped into my mind when creating it.
Overall, I decided to name my typeface design, 'Ean' (pronounced: Anne). As I was originally inspired by my mother's glasses, I thought it would be fitting to name it after her.


Creating the Display Poster
Firstly, I used the sentence which was provided by Mr Vinod, "I am, a type god. Obey me!"
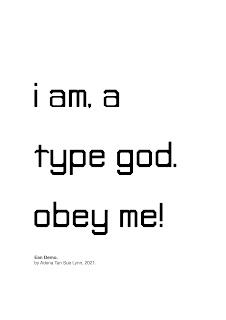


After that, I tried to see how they would look if the colours were inverted.


Overall, I feel like I like Figure 2.6.6 (Uppper left) the most. I felt like it had proper usage of white space where Ean's letters were shown nicely, but didn't feel too crowded. I also preferred the sentence I wrote as it had some irony to the very boxy design of the type.
Want to play with Ean?
Feel free to type anything with the following characters: a b d e g i m o p t y ! . ,
Final Submission:
Download 'Ean' typeface: https://drive.google.com/file/d/1hB0ccmsw-uORDjmyxoK48TxOFWVH0MLu/view


Feedback
Week 08 (15/10/2021)
General Feedback: Before sketching. draw baseline, ascender line, capline, etc.. It's okay for the bottom of the letter to breach slightly, but never the top.
Specific Feedback: When sketching, use more tools, as different tools (their strokes & nibs) can bring out more varied looking sketches. It would be better for sketches to have more contrast and/or thicker. Overall, the level of complexity increases when the designed typeface is thinner/thicker. which leads to having a regular weight be the best to start with. When it is too thin, the legibility of intersection may be affected & becomes more delicate. It also requires looking at the overall form. Designs can start with enforcing a standard width, which will choose the typeface's feel of width. Choose an existing typeface to refer to on the width. Median line for t & h has to be studied & looked into (As they are slightly below/overshoot the median line). Unless it is unicase [or celtic (calligraphic)], however, it can look a bit lost.
Week 09 (22/10/2021)
General Feedback: Guides can be used while making the typeface by going to preferences>guides&grids>subdivisions. With the comma, the part which comes down needs to be thicker so that it is more visible when typed out. The letter 't' is usually a bit smaller on the left side.
Specific Feedback: Push in the lines of the 'd' & 'b' to make them look more even. The design is fairly easy, so it will be better if it's even, or else it'll look like mistakes.
Reflection
Further Reading
For further knowledge, I decided to read 'Typographic Design: Form and Communication', which was provided to us by Mr Vinod in the Facebook group.

First, I decided to read Chapter 03: Legibility to try and further understand why legibility in type is so crucial.

In the short excerpt above, I was able to gather that legibility in typography is so important. Even though it can be tremendously misunderstood & neglected by designers, it requires constant study and evaluation to be good. Readable type is achieved by the ability to control qualities and attributes.

The above page reminded/taught me a few things:
- The primary purpose of a letterform is to convey a message to our minds. With that, each letterform has to be designed with clarity and clear distinction from one another.
- The legibility of a typeface is dependent on: contrast, simplicity & proportion.
- Occasionally, typographic designers will bend the criterion of legibility to express themselves.
- Despite the innumerable variety of size, proportion, weight, and elaboration in letterform design, the basic structure of the letterforms must remain. For letterforms to be easily distinguished, sufficient contrast must exist.
- The letters can be classified into four groups, according to their contrast properties. (shown as such in the bottom diagram)

With the above page, I was able to learn:
- Upper halves & right halves of a letter are the easiest to distinguish.
- Dominant letters within the alphabet that help us in word recognition are those that have either ascenders or descenders.
-
Through studies, distinct
iveness in lowercase letters can be ranked accordingly by: d k m g h b p w u l j t v z r o f n a x y e i q c s. (can vary with each typeface) - Most frequently used letters (example: vowels [a, e, i, o, u]) can be the most illegible and the letters c, g, s, x are the easiest to miss. The letters f, i, j, l, t are commonly mistaken for each other.
- If the shape of a letter changes, it is also perceived differently. The shapes of a letter are cues, which allows for people to distinguish them easily.
- When text is set completely in capital letters, it loses a sense of legibility and makes it harder for the reader. It also takes up more space in comparison to lowercase text of the same size.
- Lowercase texts forms words that are easier to tell apart due to their irregular shapes and internal patterns.The variety provides a rich contrast that provides satisfactory perception.
- Too much or too little spacing between the letters can also cause disruption of reading.
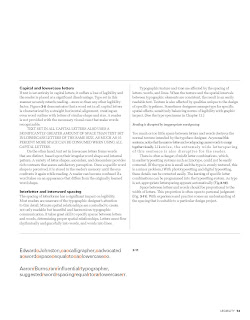
After reading this chapter, I took it upon myself to read the following article.

To summarize, I learnt that:
- When working with fonts, we use typographic units. We typically use the point, which is the smallest typographic unit.
- Typeface designers can freely decide how to use body height in order to create balance between a printed-glyph & a non-printing space around it.
- If a more open feel is desired, typographers may cut away a lot of the letter body. Typefaces may make full use of the available design space by reaching the boundaries of a glyph's bounding box & beyond.
- To consider sizes, we should also consider the desired effect the typeface will bring.
- Shapes, line width, letter width & the x-height is the main decisive factors for the optical size.
- With all that, there is no universally valid basis for body height usage. Font sizes are relative. A trained and experience-based individual are the best tools in determining the right sizes for their fonts.


